Exiftool
This page details how to set a Blender image for exporting as Equirectangular Panorama, and how to edit its exifdata so that it will be automatically read as a 360 degree image in Facebook.
Contents
Blender settings
- When exporting a Blender scene, remember that your camera should be in the very position of the intended viewer within the virtual "room" or space.
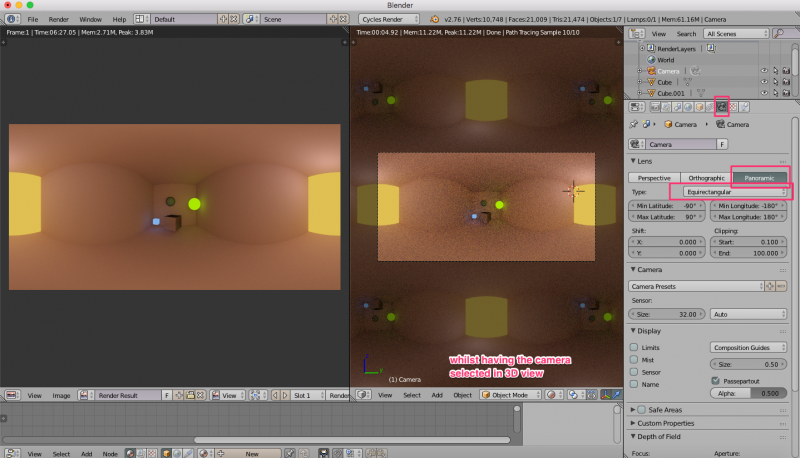
- Camera setting should be Panoramic > Equirectangular
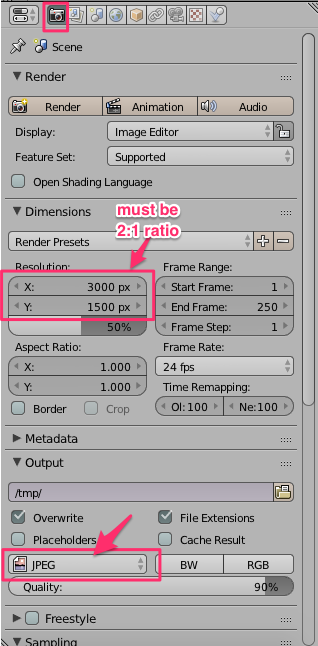
- Render setting should be for an image in a 2:1 ratio (not exceeding 6000 x 3000px)
- Save the image in JPG format
Installing ExifTool on OS X
From Exiftool's website: "ExifTool is a platform-independent Perl library plus a command-line application for reading, writing and editing meta information"
There is more Installation information here: http://owl.phy.queensu.ca/~phil/exiftool/install.html
Its easy to install it on Mac!
- Download the ExifTool OS X Package from the ExifTool home page - http://www.sno.phy.queensu.ca/~phil/exiftool/
- Install as a normal OS X package. (Open the disk image, double-click on the install package, and follow the instructions.)
You can now run exiftool by typing "exiftool" in a Terminal window.
By default when you open Terminal you'll be in the home folder and it will look something like this:
Last login: Mon Nov 28 12:21:11 on ttys000
dbbd:~ debbieding$
To look at what files/directories are inside your Home Folder (a folder is also known as a directory), you can use ls to list out the items in your Home folder. You can also use ls -l to see it in more detailed list form.
You need to navigate to the folder that your image is in:
- From the default when you first open Terminal, if you type
cdand press the Return key, it will go back to your Home folder. -
cd ..goes one level up -
cd <directoryname>goes one level down into a directory called <directoryname> within your home folder - If your image is on your desktop, in order to go from the default home folder to desktop, you usually just type
cd desktop. Note how the line on screen now looks something like "dbbd:desktop debbieding$" instead of "dbbd:~ debbieding$" (the tilda ~ is now replaced by the word "desktop") - list out the items using
lsand confirm that your image is within the folder. - run exiftool with this line to change your photo's exif data (replace "blenderrender" with your own file name)
exiftool -ProjectionType="equirectangular" blenderrender.jpg
Your panoramic image is now ready for upload to Facebook! It should be automatically detected as and then rendered as a 360 photo when you upload it.
- Useful tip: to cancel a command line process in Terminal press CtrlC or CtrlD
Requirements for creating Facebook 360 Images
- Photo should have 2:1 aspect ratio
- Maximum file dimensions of 6000 by 3000 px
- Exif XMP tag, "ProjectionType=equirectangular"
Tricks
It was found that setting the Make to "RICOH" and Model to "RICOH THETA S" will also create images that get 360 treatment in Facebook - once the image is in a 2:1 aspect ratio. This is because its a popular pano camera.

