
Table of Contents:
- Flat Viewings
- Online Research
- HDB Resale Flat Purchase Process
- HIP Options
- HIP Works & Bathroom Fixtures
- Renovation Budgeting
- Appointing Renovation Contractor
- House Design Layout
- Painting Scheme
- Laminate and Tiling Selection
- Hacking Works
- Aircon Installation
- Electrical Distribution
- Lighting Design and fixtures (fans, heaters, oven switch, etc)
- Carpentry / Blum Hinges
- Door and Door Frame Installation
- Windows Installation
- Blinds Installation
- Non-built-in Furniture (Ikea, Hipvan, FortyTwo, Qoo10, etc)
- Household appliances (Fridge, Washing Machine, Dishwasher, etc)
- Plumbing (Sinks, Washing Machine, Dishwasher, etc)
- Moving Day
- MORE TO COME…
6. Renovation Budgeting

When we first saw the online listing for the flat, I admit that it crossed our minds that it might have been on fire once. Alarmingly, when we did a cursory google search of fires in the area, there HAD been a fatal fire incident in the block in the recent past, befitting of the sales timeline of the flat. At this point, most normal people might run away from such a flat. BUT WE ARE NO MERE MORTALS. Also we were on a budget. How were we ever going to find an amazingly priced flat in the Central region? Possibly by going against the trend by looking for weird flats that might not attract the typical Singaporean buyer. (On the practical end, the majority of buyers in Singapore are likely to be Chinese just based on demographics, so we just had to think of what the typical Chinese buyer might avoid) So we persevered in digging up more on the story, and found that it was definitely a different flat that had been on fire.
ST (20 April 2017): Fatal fire in flat: Clutter likely hindered woman’s escape
We were sorry to read about the Rowell tragedy, but after investigating further: GOOD NEWS EVERYONE, THIS FLAT HAS NEVER BEEN ON FIRE BEFORE! And that totally black Electrical DB box that we thought might been burnt?? It was outdated but actually fine on the inside; it was just that someone had painted it completely black. In any case the flat was not one of those bright cheery viewings poised to sell. It hadn’t been maintained in a very long time. The things it had stacked against it were:
- Located in Little India – which is not typically known a popular area for ‘typical Chinese buyers’ – and where the ethnic quota system is flipped (Indian quota maxed out as opposed to the usual case of Chinese quota maxed out) – flipped in our favour though, so YAY!
- Having been on the market for more than 6 mths – garnering very high number of views on all the property listing websites, with signs that it may have been priced at 420 initially but that the price had been lowered – which raised the question of why it hadn’t sold for so long? why hadn’t someone else seen the value in this humble little flat?
- Extremely “original condition” – dirt or joss stick/religious paraphernalia smoke marks everywhere, no fixtures, no fittings, might not have been renovated ever since the 80s, kitchen would need to be hacked and completely done from scratch – could we handle or afford doing a very extensive renovation project?
Since it was in a very “original condition”, we knew it would require a lot of renovation works. The next step was to try to intelligently guess the cost of the renovation so we could set a reasonable budget of sorts – by thinking of what were the absolute essentials, like having a BED to sleep on, having the electricals done, getting plumbing done, putting in air conditioning, having a kitchen sink, etc. With the caveat that I have never done a house renovation project before, this was the budget I (naively?) drew up to estimate the cost/budget on my side. All the items in Green were considered necessary, the ones in yellow could be substituted by cheaper off-the-shelf alternatives.
When I cross-checked the number with the very experienced dingparents, they had independently produced a similar calculation (although it was with different line items!!!). Anyway in my case, I thought that this was a reasonable number based on the cash savings I had available after paying the deposit for the house, and with George contributing an equal share this was definitely a number we could afford without overstretching ourselves or emptying out the bank (still able to put aside a reasonable amount of savings for emergencies).
Reality: So…. did we keep to this specific budget in the end? No. Not really if you really go and count all the extra bits we had to get outside of the main contractor works. Insert facepalm. Like any good episode of GRAND DESIGNS (ahem) we ended up exceeding our initial cost and time estimate. We were total noobs at this. But I’ll do a postmortem of this later.
7. Appointing a Renovation Contractor
The next major challenge was that we needed to appoint a renovation contractor who could help us with project management and most importantly, the complicated bits in the kitchen – hacking, carpentry, water points, gas, etc. You’ll always want to speak to several contractors before deciding on one – as it will be useful to see several versions of the itemised quotation, and to ask all the questions you want about each item they have quoted to understand what they refer to. On a practical note though, it can take a long time to speak to one contractor properly and communicate all your needs accurately, so its not really feasible to speak to every contractor that looks interesting out there – you have to make a shortlist first. We did our research (and the dingparents assisted us greatly with this too) and spoke to 4 contractors in total.
The whole point of engaging a contractor/ID is for their design advice/input. We also didn’t want a “yes-man” who would tell us that anything and everything we wanted could be magically built, because we knew that HDB flats have a lot more rules and regulations than private flats. We needed an experienced contractor who could do the project management and also point out where our planned design might encounter issues. Both me and George were working full time as well plus I had a lot of medical appointments and checkups getting in the way of being at the house – which was why we had wanted to hire an ID/contractor to project manage in the first place.
Our Timeline & Reality:
25 Feb 2019 – First meeting with Contractor
6 March 2019 – Contractor visits flat with us
8 March 2019 – Contractor drafted out first draft of agreement
13 March 2019 – Meeting to discuss first draft of agreement
18 March 2019 – Meeting to discuss second draft of agreement
23 March 2019 – Appointed Contractor and signed agreement
It took us 1 month to engage a contractor – from the start of first ever conversation to the signing of contract. Unfortunately, in the middle of renovation works, our appointed ID/contractor went MIA from time to time (uncontactable!!!) and wasn’t on site to project manage things at some critical junctions which made it very difficult as subcontractors in the house would ask us what they should do. Confusion ensued and works were delayed as a result because corrections had to be made, and we even had to move to my parents’ house temporarily for a few weeks whilst the works were sorted out between our rental and our new flat. If I could do this again, I would have wished for a better project manager…
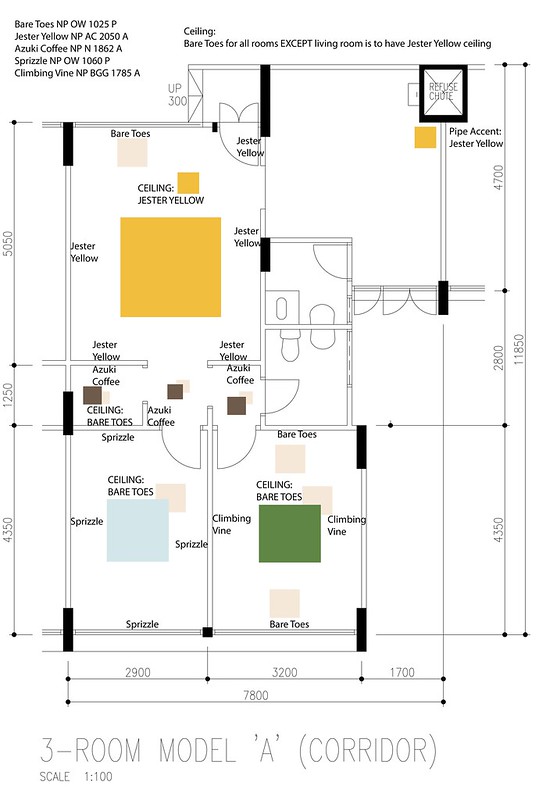
8. House Design Layout
BUY THE FLOOR PLAN: So you’ve decided you want to do your own Interior Design. Or part of the way of it anyway. The first step is to purchase your HDB floor plan from HDB – For Existing Flats – which costs $5 so you have this handy little PDF file you can edit in Illustrator. In our case the seller’s estate agent actually helpfully gave us a copy of this so we didn’t have to buy ours. Anyway, in terms of the timeline, we could have started the process of designing everything from the moment we received the key. Except that we were slowpokes.
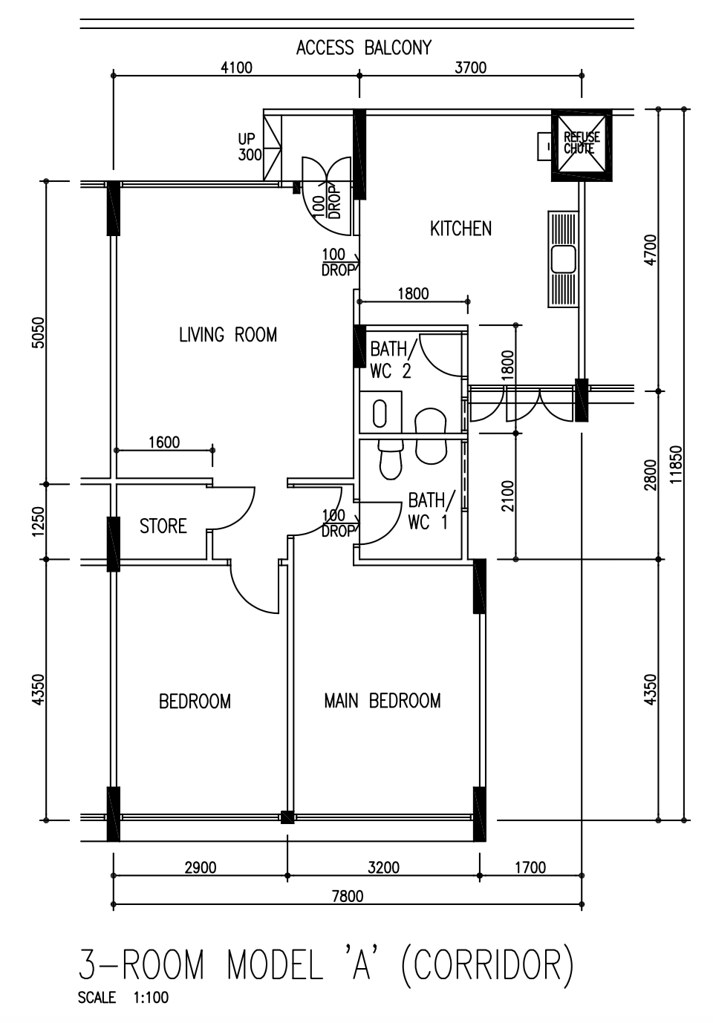
RE-MEASURE YOUR HOUSE: Even with the floor plan, you’ll notice that it is nothing like the actual flat you have. So you have to go and measure everything on your own again. This is really crucial. For me, what was useful was this diagram that the dingparents had made. They might not be designers but I’m impressed with all of their meticulous drawings! I’m teaching the Drawing and Illustration module at the moment and I almost want to show the dingparents sketches to the class as an example of how learning technical drawing can still be useful later in life and beyond design school.
DRAW UP A DRAFT LAYOUT: This is where the design phase went a little bit mad, as George preferred to work straight on something that he could view in 3D and VR, whereas my first impulse was to lay out everything in 2D on Illustrator, which I am very fast on.


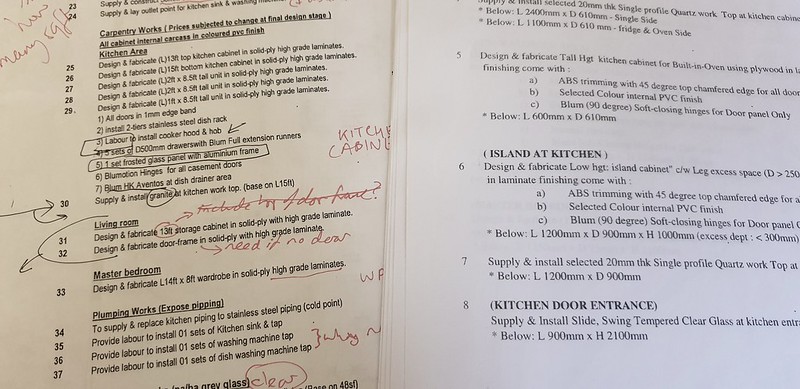
Draft 2D of Kitchen – 9 March 2019 (by DBBD)
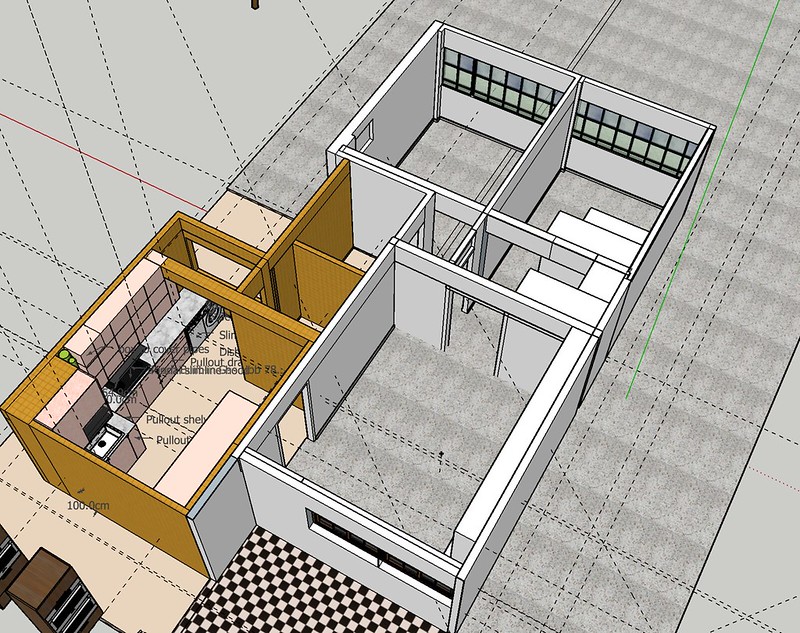
Draft 3D Layout of House – 13 March 2019 (by George)
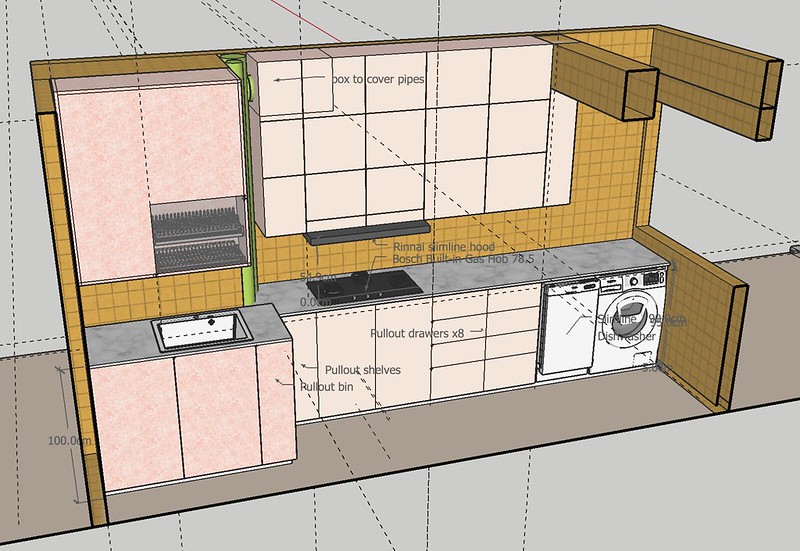
Draft 3D of Kitchen – 13 March 2019 (by George)
Reality: We got stuck on this for a very long time because we were both working full-time during this time period (I had several exhibitions, having to give talks and speak on panels, plus my full-time teaching job). I found it difficult and overwhelming to start due to a difference in working styles – George preferred working spatially and moving the blocks around in 3D and viewing it with the Vive in VR – but I personally needed to work first from a 2D plan before progressing onto a 3D layout. Also if I could go back in time and tell myself one thing, it would be that there is no need to feel like you have to go to the contractor with a perfect finished design because the design is always changing…
8. Painting Scheme
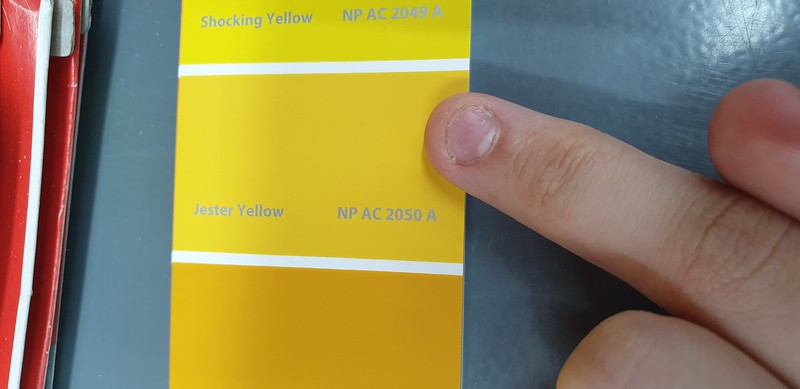
We went down to some hardware store near our flat with a big NIPPON PAINT on its signage and copped a feel of their Nippon swatch. After standing there for a VERY LONG TIME (almost as if we were contemplating stealing their giant paint swatch), the man just dug up a slim paint brochure with ALL the colours in it and gave it to us so we could go home and decide on colours at home with the booklet.
There are actually a few types of Nippon Paint available – here in order of price:
– Nippon Paint Matex White – the cheapest generic white – commonly used as the base coat and for ceiling
– Nippon Paint Vinilex 5000 – the standard paint commonly used on walls
– Nippon Paint Easy Wash – the washable paint we specifically requested for
Reality: We noted however that during the painting process that the house painters did not use the Easy Wash paint we specifically requested for and instead had used the Vinilex versions of the colours we had chosen!! – so we did ask our contractor to reduce our invoice because Vinilex is cheaper than Easy Wash. Eg: 1 litre of White Vinilex is $20 sgd whereas 1 litre of White Easy Wash is $25 sgd.
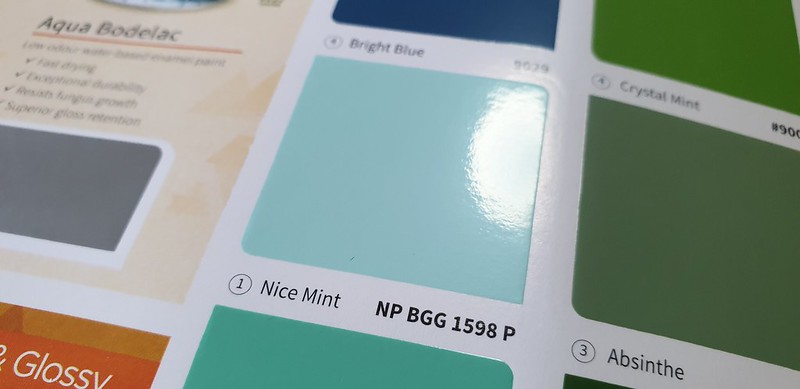
Another thing to note is that things like pipes and door frames will require the shiny Enamel paint. For this we used the Nippon Aqua Bodelac, a water-based acrylic gloss enamel paint, which as you can see from the sample above is a shiny glossy paint unlike our wall/ceiling paints.
9. Laminate and Tiling Selection
Colour Core Laminates for Carpentry
Firstly very early on we chose a laminate colour so we could choose the tiling and other paint colours. This was in a big book of laminates.

There are many natural/wood laminates with textures such as these. We didn’t like these as they were quite artificial.
The “default” solid colour laminate was something that had a black core like this. We didn’t like this as much either.
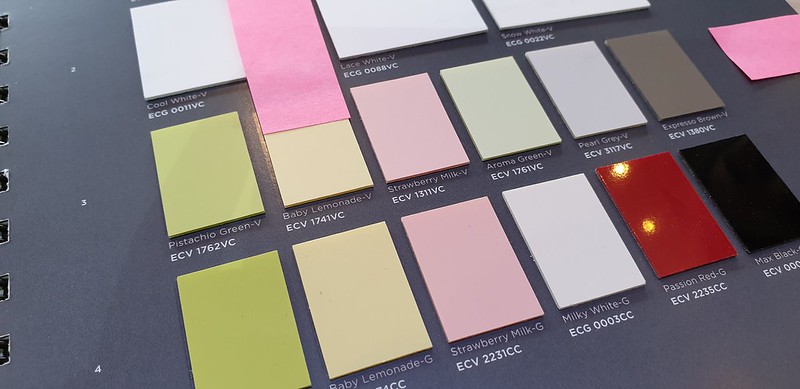
We preferred the COLOR CORE range which was more expensive (an add-on) but had the colours we liked, in particular, BABY LEMONADE.
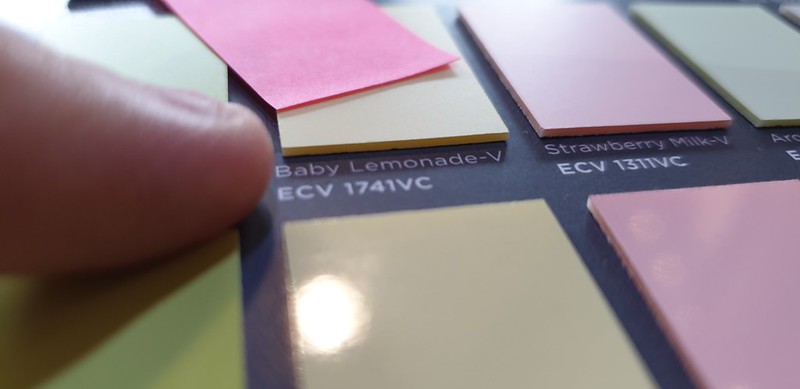
I don’t really know how I could have made our laminate colour choice more obvious… because as the story goes, our contractor GOT THE LAMINATE COLOUR WRONG DESPITE THE ABOVE PHOTO BEING SENT OVER (and the code number being written out) in a text message, annotated on whatsapp, in the google docs, literally everywhere. I must have said BABY LEMONADE all the time as well, which as its name suggests, is a light lemon colour. When it went up, I saw a photo of the laminate, and I thought there had been a blue protective film over the laminate hence it being green from afar, since a lot of things in our house also had a thin blue film over it, such as the windows, the HIP gate and the Ikea furnishings, etc etc). However, it eventually became clear that there was no blue film, and that green was the final colour in the end.

As a result the contractor eventually waived the add-on fee as recompense for this extreme oversight. (They’re lucky that we can live with Pistachio Green as a major colour in our brightly coloured haus, otherwise we would have had to reject it and redo it all!)
Kitchen Wall and Ceiling Tiles
A Kitchen for Asian Food in Hot Climate?: Singaporean kitchens are partially wet spaces which are usually fully tiled, unlike the kitchens in London/Europe which are generally regarded as mostly dry spaces with lots of wood and dry fixtures. There’s usually at least one gully hole (small gutter for surface water to drain) in the kitchen floor (as well as the toilets), so you could theoretically sploooooge water all over your kitchen (and toilets) with wild abandon because it will drain off, and I was told that Kitchens are almost always fully tiled because of the type of Asian cuisine cooked in houses – which tends to be of high temperature (trying to achieve “wok hei”) and generates a lot of oil or spice vapours. To be honest we don’t really cook full-on Asian wok style here in our household (we’re more…. fusion? experimental?) but we still decided to tile our kitchen fully to suit the local climate and custom.
Fully Tile or Partially Tile?: You can fully tile the walls in your kitchen, or to just tile the visible areas. At first we wanted to do the latter and not tile the area behind the carpentry (because no one will see it). However, in the interest of changing designs along the way, if one selectively tiled the kitchen, this might result in MISSING TILEWORK later on if you decide to change the location of the carpentry or choose to renovate several years down the line. So we decided to fully tile in the end. It didn’t cost all that much more.
Size of Tile?: Smaller tiles might mean more grouting lines in the future which might be difficult to clean. Also… according to recent ST and BT articles, larger tiles were equated with a more “condo-like finishing”, as well as “construction productivity and efficiency”.
Dimensions of our chosen tiles were:
Wall Tiles: 60cm x 30cm (laid horizontally)
Floor Tiles: 30cm x 30cm
Backsplash?: The purpose of the backsplash is functional. In European kitchens I noticed this is the only area that is tiled in order to protect the wall behind sinks and stove from water and oil splashing.
Glass Backsplash?: We contemplated doing a Kitchen Backsplash in tempered glass but then we looked at the cost. Also we would need to predetermine all the placements of the holes to be cut for power outlets once it has been set against the wall, so this would require a lot of advance foresight and planning which we admittedly tend to lack haha. So… no special backsplash! Just the same old good white wall tiles behind the stove area! If you do feel the need though, you can change the tiles to a different one in the “backsplash” area for design purposes, but in any case our entire kitchen is tiled from floor to ceiling.
There are many places to get tiles in Singapore but our contractor uses Soon Bee Huat on Changi Road. We went down to the big tiles showroom at Soon Bee Huat with one purpose, and that was to ask them for a mustard yellow wall tile. Unfortunately, you will find that they are much more normal and traditional than we expected with their selection range. When asked if they had anything yellow, they pointed us to something brown. They did not have ANYTHING close to yellow besides these road crossing tiles, and some pasty yellow-brown floor tiles (not suitable for wall).

So… er…. who wants some tactile road crossing tiles in their kitchen?
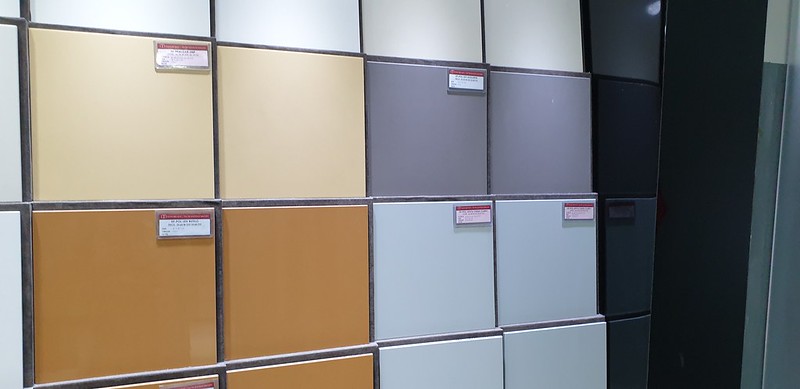
These yellows and browns are only for floors and not really our thing either. Also far too shiny. We don’t like shiny.
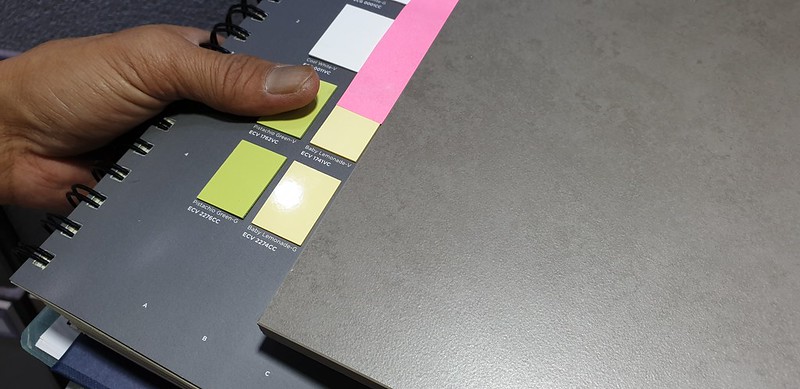
Eventually we decided on big white slab tiles which seemed a sensible and modest choice, along with dark grey-brown tiles for the floor. The big tiles could be grouted with white which would make them sort of fade away into the background. We also brought down the laminate book to compare the tiles with our chosen laminate colour.

We asked them to cut two samples for the floor tiles so we could take it home and step on them for a while to see how we felt about them. In our very Scientific Tile Test, we also poured old coffee on the tile samples and smeared belachan chilli on them to see which was easier to clean after the stain had dried (plz excuse our very grotty kitchen sink).
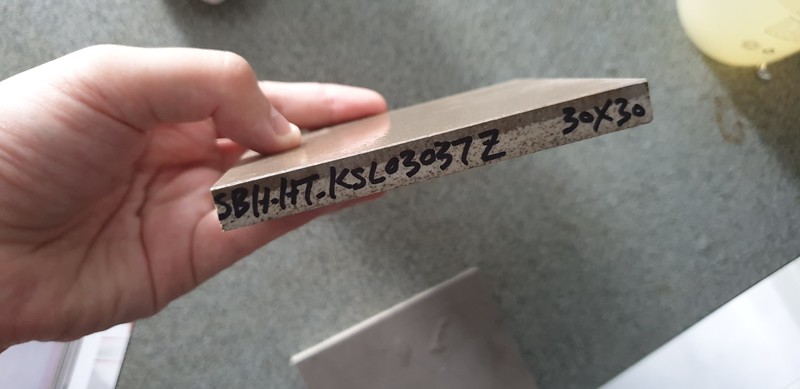
A clear winner for our tile was found!
Our decision: When in doubt just go with neutral colours like completely white wall tiles and dark floor tiles. I don’t regret this at all, you can still put in weird colour accents through appliances and fixtures and other things you fill your kitchen with! We were very happy with the all-white wall tile which from a distance looks like it could all be a perfectly contiguous white painted wall. For the floor tile we preferred a tile with the “sandy” feel (as opposed to a shiny waxy feel) and we found that it seemed to clean more easily. The floor tile with a waxy/shiny feel got quite slippery when wet and we felt that oil also clings more to those kinds of tiles.
Coming up next in Part 3: the commencement of works in the house with hacking, aircon, electrical, lighting, carpentry, hinges, doors, windows, and blinds. Phew!
Related posts:
 RENOVATION FOR THE D’OUTH HOUSE: Part 3 – Hacking Works, Aircon Installation, Flooring, Electricals, Lighting, Carpentry, Hinges, Doors, Windows, and Blinds
 RENOVATION FOR THE D’OUTH HOUSE – Part 1: Flat Viewings, Online Research, HDB Resale Flat Purchase Process, & HIP Options
 Seoul Apartments – A Visit to a Model House
 Paintpusher: Computer-aided Oil Painting (SUPER–TRAJECTORY: Life in Motion, ArtScience Galleries, 20 February to 8 March 2020)
 Ultimaker 2: The Importance of Filament Guide design, and Underextrusion Troubleshooting
 House: Singapore Psychogeographical Society Talk (22 July 2012)
 World, meet “Bizkit”
 The Plaster holding together a Reconstruction of a late Qing-dynasty Brick Gate House