Recently my challenge was to produce 2000 x 3 frames for the production of three holograms. At 50 minutes per frame, 6000 frames would have taken a frightful 208.333333 days to render out on one already relatively speedy laptop. On the slowest mechanised computating potato in the household (5+ year old Macbook Pro), it would have taken several hours. But the real issue was not the complexity of the scene, but the way in which I had initially constructed the scene, and the necessary render settings.
After several weeks of editing (and frantically googling “HOW TO REDUCE RENDER TIME”), here is a compilation of ways that I used to reduce my render time (CPU) for a single frame from a horrible 50 minutes to 1-2 minutes. Its not an exhaustive list, but I thought it would be useful to WRITE IT ALL DOWN NOW in case the Future Debbie completely forgets everything after the hard slog of trial and error of the last few weeks..
1. Duplicate Linked Object Instances the right way
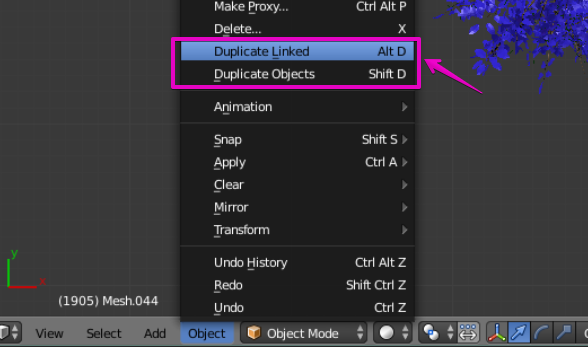
This may seem pretty obvious but I think it needs to be on the top of every list. The right shortcut to duplicate an instance of an object is ALT-D not SHIFT-D. SHIFT-D produces a completely new object with no reference back to the data of the original object. A linked object shares the same object data, so any edits you make to the first object will make all the other linked objects change as well. When you’re in a hurry it is easy to accidentally type Shift-D instead of Alt-D, but this has the potential to make a serious impact on render time.
2. Link Object Data
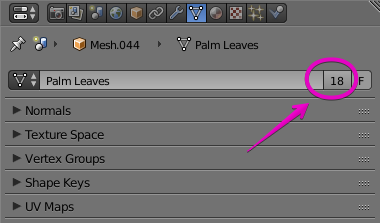
Let’s say you completely can’t recall if you used Shift-D or Alt-D to duplicate your objects. If you go to Mesh you’ll be able to see how many linked objects are currently using the same data. If your mesh is unique and unlinked, first select what is going to be the master, then all the other objects you want to have using its data, and press Ctrl-L whilst the mouse is over the 3D view. You’ll get the “Make Links” dropdown menu and you should select Object Data to link the objects. Other links for materials, groups, etc can also be made using this shortcut.
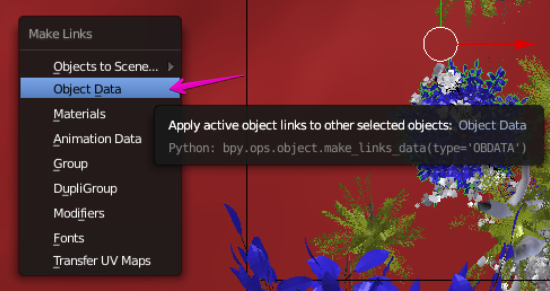
Note that if for some reason you do accidentally select different objects which aren’t at all similar, note that all the latter objects will be changed to have the object data of the master object anyway…
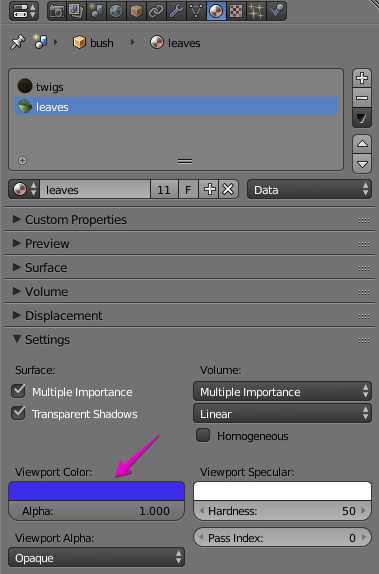
In general, I personally found it useful to assign my materials really crazy colours in the viewport so that I could see at a glance which objects were the same and which were not.
3. Clamp Direct and Indirect
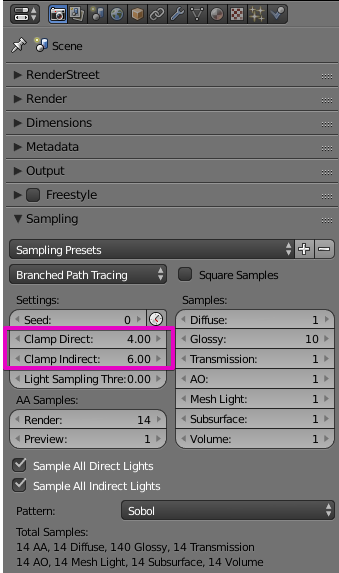
Usually you end up turning up the samples for a scene because there are too many ‘fireflies’ and noise, but clamping values can quickly remove these stray white dots which appear on the render. Clamping sets the very lightest (brightest) samples to a maximum value so it removes those stray white fireflies, but in the process, it will reduce the bright “pop” or light sheen that you might have wanted to achieve with certain glossy materials.
If you set Clamp too low, it will also cause the ENTIRE scene to be too dark/dimly lit, especially if you are using HDR for Environmental Lighting, so don’t set the Clamp too low. The general advice is to start from a high number like about 10 and then work your way down to see what works for your scene. I was able to set Clamp Direct to about 4 and Clamp Indirect to about 6 and still achieve acceptable results. As for the overall “dimming” effect the Clamp will have on the scene, you can simply increase scene brightness through the compositor with a Color Balance node, or you can simply do it in post.
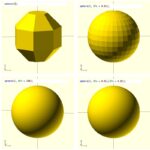
4. Subdivision surface
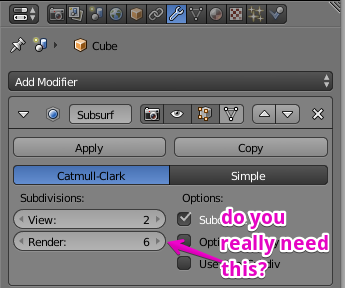
Subdivision surface is a modifier commonly used to create a smooth surface mesh from a blocky linear polygon mesh. It is done by splitting up the faces of the mesh into even smaller faces in a way that gives it a smooth appearance.
It is worth checking if you have stupidly set a subdivision surface of VERY MANY iterations for something incredibly trivial, tiny but also incidentally heavily duplicated in the scene…
5. Decimate

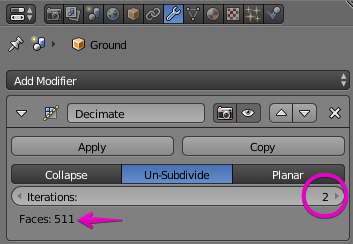
Did you subdivide your terrain into unwisely tiny bits and then handsculpt it with a 5px clay brush?? If there is complex modelling or you’ve applied Subdivision Surface to a mesh and are now regretting it, you can undo your CPU-killing subdiv-happy ways by decimating the meshes that you don’t need smoothing on! Add the Decimate modifier to reduce number of faces.
6. Simplify
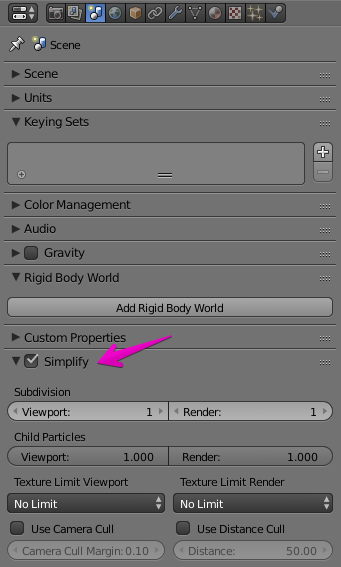
Let’s say you’re just rendering a preview for yourself and its not the final render. You can quickly set the global max Subdivision Surface and Child Particle number here under Scene > Simplify. Just remember to uncheck the Simplify box when you’re producing the final render.
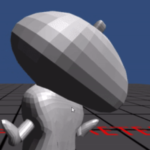
7. Delete unnecessary terrain
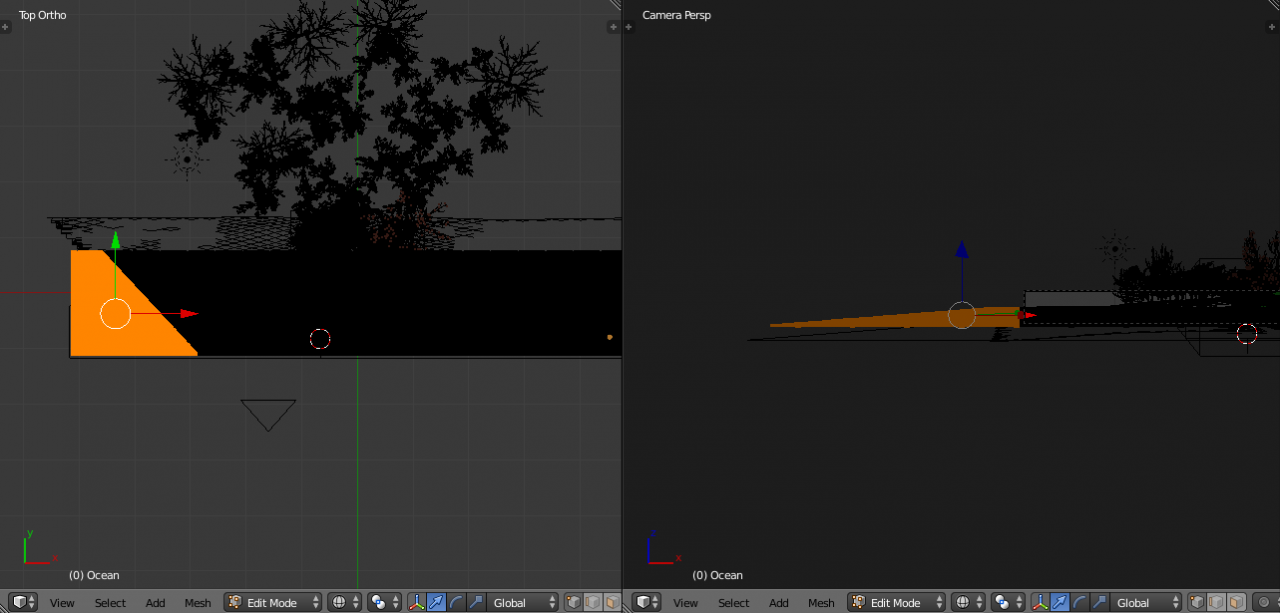
Set up Blender so that you can see several angles of your scene at the same time, along with the timeline if you need to scrub through it quickly. Go into Edit mode (Wireframe) and highlight the excess terrain that never appears in Camera view for the entire timeline using either B (to draw a box) or C (to paint it with a circular brush). Make sure you’re viewing in the Wireframe mode though, because if you’re viewing in Solid you’ll only be able to select the vertices that you can see, rather than all the vertices in that area regardless of whether you can see them or not.
The most handy shortcuts in 3D view are the 0 and 7 button:
0 is Camera View
7 is Top view
5 to toggle between Perspective view and Orthographic view
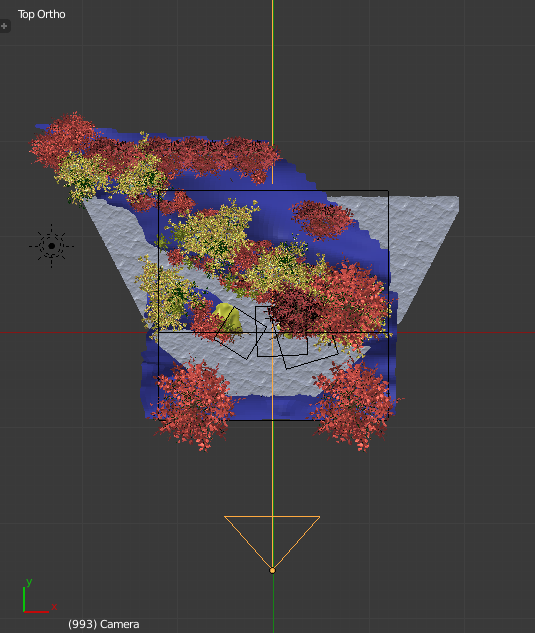
The resultant landscape will look a bit weird like this but you’ll save time not rendering all the bits. But do keep the bits which you’ll need for the light bouncing off to produce a realistic scene.
8. CPU/GPU Compute and Tile Size
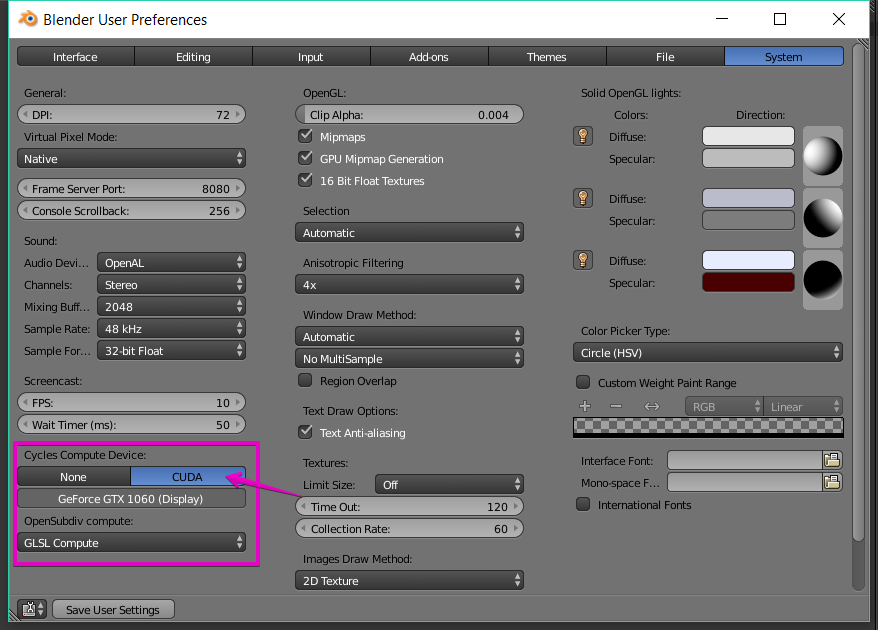
If you have a Nvidia graphics card, you’ll still need to enable it in Blender’s User Preferences in order to use GPU, which can drastically cut down your render time. When GPU works, its like magic. GPU can be dramatically faster than CPU but is also limited by the total amount of VRAM on the card – so once it hits that limit the rendering process will simply fail (memory error). Also I had to dramatically rein in my expectations – I have always insisted on using desktop replacement laptops rather than a desktop for portability (especially for my kind of work) – but one has to consider that laptop GPUs generally aren’t as powerful as the ones in desktop GPUs in terms of VRAM, No. of CUDA cores, and overall speed.
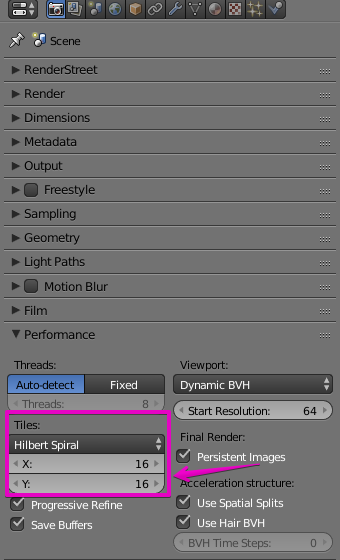
It is generally said that the tile size should either be a perfect squares or factors (ie: divisible fraction) of the final resolution (having smaller bits of tiles left over is wasteful) but I think a lot more testing would be required to determine for the type of scene and type of CPU/GPU. Generally, if you reduce tile size too small, it incurs more overheads of switching between tiles. You should experiment with the numbers and see what works for you…
What worked for my scenes (Intel Core i7-7700HQ @ 2.80GHz / Nvidia GeForce GTX 1060 6 GB GDDR5):
For CPU an ideal Tile size seems to be around 16×16 or 32×32
For GPU an ideal Tile size seems to be 312×312
9. Number of AA Samples / Progressive Refine
The number of AA (Anti Aliasing) samples will increase render time exponentially, and this was largely why my first renders were taking 50 MINUTES PER FRAME even on the best laptop in the entire household! How many samples are enough samples? How do you find out how many samples are good enough for you, visually?
Under Performance, there’s an option for Progressive Refine which will progressively show you the overall image at each sampling level. It can be slower to have to complete the entire image together but you can also stop it when you think the image is good enough. Its useful to eyeball it until you find out what number of samples you are happy with, then just use that number and uncheck progressive refine so it will be faster.
10. Resolution, Output File Location, and Output Quality

When you “double” the size of the image, you’re actually making it four times as large and your image will take 4 times the CPU/GPU to compute! When making a preview and not the final render, you can set resolution to 50%. But don’t forget to uncheck it when you are doing the final render!!! (ARGH!!!)
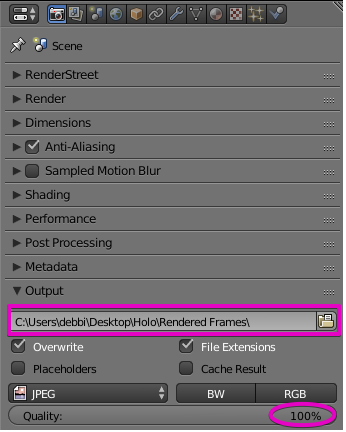
Make sure that you have set the correct Output file location. If you are opening the blend file for the first time on a new computer, MAKE SURE YOU HAVE RESET THIS. Blender does this thing where it doesn’t tell you the output folder/drive doesn’t exist – it will happily render but only tell you at the end of the process that it had no place to save the file.
Below that there’s also the compression/quality setting for it. For a preview you can set it lower but remember to set it back to 100% for the final render.
11. Selective Render / Animated Render Border
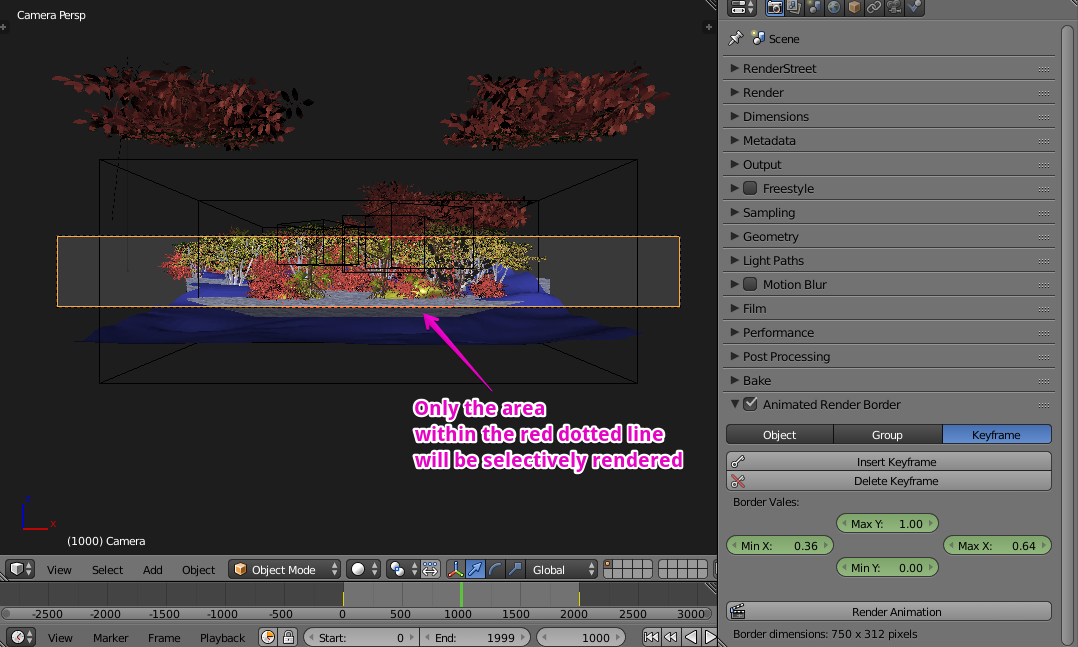
Whilst in Camera view (Shortcut Num-0) within 3D view, if you use the shortcut CTRL-B, you can demarcate the “Selective Render” border (which appears as a red dotted line) in camera view. To release this Selective Render Border, its CTRL-ALT-B.
Ray Mairlot’s extremely useful Animated Render Border allows you to selective render an object moving through a scene, or to even create an animated border that can be keyframed.
When using this add-on, the final output is a frame that will still be the size of the entire render resolution, but only the selective render area will have an image and the rest will be alpha transparent.
12. Use a Render Farm
Ok so after I shaved scores of minutes off the render time to 2 minutes per full resolution frame, I realised that 2 minutes x 6000 = 8.33333333 days – and that was 8.33333333 days that I certainly did not have! There are limits to what a great laptop with a good graphics card can do. When the computer is rendering – you can’t really use anything else that taxes the graphic card or processor when its rendering, so it basically disables the computer for the duration of the render.
So.. there was no other way around this – I had to use and pay for a render farm. I tried out Render Street, TurboRender and Foxrenderfarm as they were the farms which came up when you search for Blender Render Farms.
The basic process for all of them is:
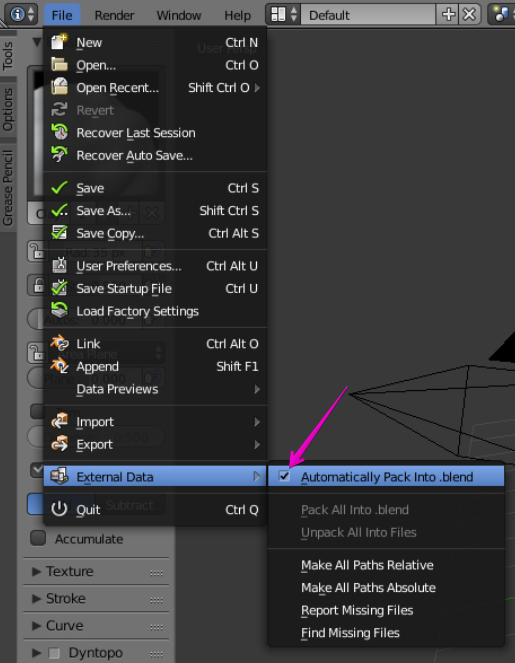
– Pack external data into blend file (tick the option to automatically pack)
– Upload a zipped copy of the blend file
– Choose your render settings
– Pay the render farm some money (for slower render) or LOTS OF MONEY (for faster render)
– Monitor render progress and render quality through web interface
– Magically download completed rendered files in record time
[Do however note that the Animated Render Border add-on mentioned above in this list will not work with the render farms, but you can write to most of these render farms regarding desired plugins and they will let you know if the add-ons and plugins can or cannot be installed]
A more comprehensive review of render farms coming up in the next post…
Related posts:
 Render Farms: Which Blender render farm is the fastest and most intuitive?
 Quick things to do in Blender: Video Editing, Bake Sound to F-curves, VR/3D Storyboarding, Compositing 3D model into photo, and Motion Tracking
 Rochor Dream: HSL/HSV colour values and making an iridescent/rainbow shader in Blender
 Blender & Unity: Manually Rigging Blender Humanoid Characters for use with Unity Mecanim
 A Shopfront in Blender and Unity: Lazy Speedrun using UV Project from View
 365 Days of 3D – Blender
 OpenSCAD: transformations, minkowski sum, and lithophanes
 The Kappa’s Izakaya: 360° Illustration Process